How to Reduce Wood Waste: 7 Strategies for Your Workshop
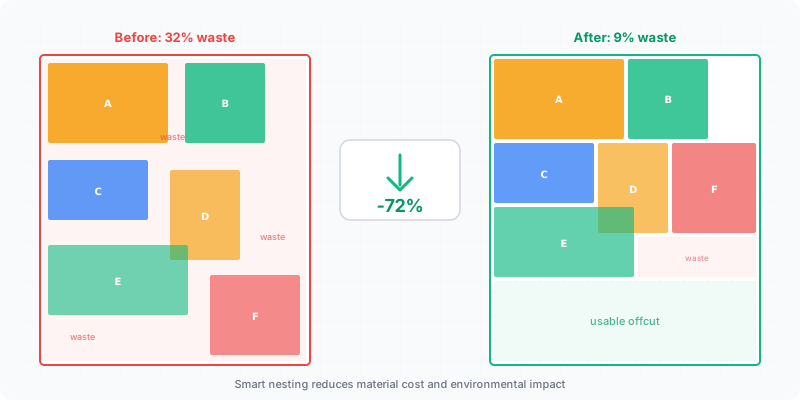
A standard 2800×2070 mm melamine sheet costs $40–80 depending on color and finish. Waste 30% of it and you’re throwing away $12–24 per sheet before you’ve built anything. On a kitchen project using 8–12 sheets, that’s $100–290 in the dumpster. Multiply that across a year of projects and the numbers get uncomfortable fast. The good news: most of that waste is preventable with better planning and the right tools.
What you’ll learn in this guide:
- How to calculate the real dollar cost of your material waste
- Seven specific strategies that reduce waste from 30% down to under 12%
- Why optimization software consistently outperforms manual and spreadsheet planning
- How to manage offcuts so usable material stops ending up in the scrap bin
The True Cost of Material Waste
Most workshops don’t track waste. They buy sheets, cut parts, and toss the leftovers without adding up what they’re losing. Here’s what the numbers actually look like.
Work an example through, and treat every figure in it as illustrative — your own sheet price and your own waste rate are the only ones that matter. A mid-size cabinet shop building 3–4 kitchens per month uses roughly 40–60 sheets. Assume a 25% waste rate and a sheet price of $55: that is $550–825 per month in wasted material, over $8,000 a year. A hobbyist building one project per month with 4–6 sheets still loses $55–130 each time. Run the same arithmetic on your own last invoice rather than on these numbers.
These aren’t theoretical numbers. They come from comparing the total sheet area purchased against the total area of finished parts. The gap between those two numbers is money that left your shop as sawdust and scrap.
Turning that gap into a number you can watch takes one habit: record the sheets a job actually consumed next to the total part area from its cut list. Do it for half a dozen jobs and you have a baseline — without one, you can’t tell whether last month looked better because you planned it better or because the parts happened to be a kinder size.
The three biggest sources of waste are: poor layout planning (parts placed without testing alternatives), ignoring usable offcuts from previous projects, and buying more sheets than necessary because you estimated instead of calculated.
Waste reduction with optimization
The Seven Strategies That Move the Number
Waste drops when you fix the inputs — accurate parts, the right kerf, material grouped by thickness, offcuts on record — and let the layout follow from them. The seven steps below are in the order they pay off, and the first three do most of the work.
Measure twice, mark once
Miscut parts become scrap. There’s no recovery from a panel that’s 5 mm too narrow. Use a stop block for repeated cuts on a table saw, and always verify your fence setting against a test piece before cutting into your good stock. Every miscut adds another part to your sheet count.
Build a proper cut list before buying material
Write down every part with its exact dimensions, quantity, material, and grain direction. Don’t work from memory or rough sketches. A complete cut list is the foundation for everything that follows — including knowing exactly how many sheets to purchase.
Use optimization software for your layout
Enter your cut list into an optimizer and let the algorithm arrange parts on sheets. It tests hundreds of layout combinations in seconds, something you can’t do manually. The result is a cutting diagram that tells you exactly where every part goes, typically reducing waste by 10–15 percentage points compared to manual layout.
Set your kerf width correctly
Every saw cut removes material — 3 mm for a standard table saw blade, up to 6 mm for a CNC router bit. If your optimizer doesn’t account for kerf, parts will come up short and you’ll need to recut from fresh stock. Always match the kerf setting to your actual cutting tool.
Group parts by material and thickness per [EN 13986 standard](https://www.en-standard.eu/csn-en-13986-wood-based-panels-for-use-in-construction-characteristics-evaluation-of-conformity-and-marking/)
You can only cut parts of the same material and thickness from the same sheet. Mixing 18 mm and 12 mm parts in one optimization run gives you a layout you can’t actually use. Sort your cut list by thickness first, then optimize each group separately.
Save and catalog usable offcuts
After cutting, measure every leftover piece above the minimum size you have set for your own shop (see the threshold discussion below) and store them organized by material and thickness. Label each offcut with its dimensions using a marker or tape. Before your next project, check your offcut inventory first — those pieces are already paid for.
Plan grain direction upfront
Grain-sensitive parts can’t be rotated freely, which limits how tightly the optimizer can pack them. Knowing grain requirements before you optimize — not after — gives the algorithm the constraints it needs to find the best layout on the first run. Changing grain direction after optimization often increases waste significantly.
Why Optimization Software Beats Manual Planning
The difference between methods isn’t subtle. Here’s what we see across thousands of cutting projects:
| Planning Method | Avg. Waste % | Time per Project | Missed Savings |
|---|---|---|---|
| Manual (pencil & paper) | 28% | 30–60 min | Baseline |
| Spreadsheet tracking | 22% | 20–40 min | ~$30/project |
| CutOptim optimizer | 11% | Under 2 min | ~$90/project saved |
Manual planning wastes more for a simple reason: your brain can’t evaluate hundreds of alternative layouts. You place the biggest part first, fit smaller ones around it, and stop when the sheet looks full. That first-fit approach leaves gaps that a different arrangement would have filled.
A spreadsheet helps you track area utilization, but it still can’t test rotations, rearrangements, or alternative part-to-sheet assignments. You’re doing the layout work yourself — the spreadsheet just tells you the waste percentage after the fact.
Optimization software flips the process. It starts with every possible part placement and systematically narrows down to the arrangement with the least waste. It respects grain direction, accounts for kerf, and handles dozens of parts across multiple sheets simultaneously. The output is a print-ready cutting diagram, not a pile of numbers you still have to interpret.
For a shop cutting 10+ sheets per month, the waste reduction from 28% to 11% saves roughly one sheet for every six purchased. At $55 per sheet, that’s $90+ per month — and the time savings of skipping manual layout planning adds up to hours you can spend building.
💰 Calculate your potential savings
Why Should You Cut Several Jobs Together?
Batching jobs of the same board into one optimization run is the cheapest waste reduction available, because it attacks the one source of waste that a better layout cannot touch.
Every job ends on a partly empty sheet. On a four-sheet job that half-used last sheet is a large share of everything you bought; on a twenty-sheet job the same half sheet barely registers. That waste is structural — it comes from the job being small, not from the layout being bad — and no optimizer can remove it from a single job, because there is nothing left to put in the space.
Batching removes it by letting the parts from the second job fill the gaps left by the first. Two kitchens in the same 18 mm white melamine, optimized together, share one part-used sheet instead of leaving one each.
The limits are practical rather than mathematical. The jobs have to use the same board — same thickness, same decor, same grade — you need somewhere to stack cut parts until each job gets assembled, and every part has to be labelled as it comes off the saw. A batched run that produces an unlabelled pile of look-alike panels costs more in sorting time than it saved in material, which is why shops that batch well are usually the ones that already print part labels.
Which Part Dimensions Are Actually Negotiable?
Some dimensions are fixed by the design and some are only fixed by habit, and the second group is where free material hides.
Take a run of shelves cut across a 2070 mm sheet width. At 300 mm deep you get six of them: 6 × 300 mm plus five 3 mm kerfs is 1815 mm, leaving 255 mm of strip too narrow to be a shelf. Push the depth to 340 mm and six still fit — 2040 mm plus 15 mm of kerf is 2055 mm. The shelves gained 40 mm of usable depth and the sheet count did not move. A dimension is free right up to the point where it changes how many parts fit across the board; one millimetre past that point, it costs you a whole part.
This only works on dimensions nobody will ever measure — carcass depth, shelf depth, plinth height — and never on a face that has to line up with something.
The same reasoning applies one level up, to the board itself. A cut list run against a 2800×2070 mm sheet and against a 2440×1220 mm sheet produces two different sheet counts, and which one wins depends entirely on your part sizes rather than on which sheet is bigger. Testing both takes two optimizer runs and no material.
Offcut Management: Stop Throwing Away Money
The scraps from today’s project are free material for the next one. But only if you can find them and know their dimensions.
Set up a simple system: a rack or bin area organized by material type and thickness. After every project, measure offcuts worth keeping — anything large enough for drawer parts, shelf supports, jig material, or small project components. Write the dimensions directly on the piece with a lumber crayon or stick a label on it.
Before starting a new project, check your offcut inventory against your cut list. If you have a 600×400 mm piece of 18 mm birch plywood and your project needs a 500×350 mm shelf, that’s one fewer part to cut from a new sheet. Some optimizers let you add custom stock sizes — enter your usable offcuts as available material and the software will incorporate them into the layout automatically.
The shops that waste the least aren’t the ones with the fanciest saws. They’re the ones that treat every piece of material as inventory until it’s genuinely too small to use.
Pro tip: Set a minimum offcut size policy for your shop — for example, keep anything larger than 300×150 mm. Anything smaller goes to the scrap bin. This prevents your offcut storage from becoming a graveyard of tiny unusable pieces while making sure genuinely useful material gets saved.
Where you set that line is a judgement about your own work, not a rule you can look up. The honest threshold is the smallest part you realistically build: below it, the shelf space and the searching cost more than the material is worth.
Is a Higher Yield Percentage Always Cheaper?
No — and treating the percentage as the goal can quietly cost you money in three different ways.
The first is saw time. A layout that squeezes in one more part often needs more cuts, more fence changes and more handling of small pieces. None of that shows up in a yield figure, which measures area and nothing else.
The second is the shape of what’s left. Two layouts can waste exactly the same area and be worth very different amounts: one leaves a single clean board that goes back on the rack as stock, the other leaves the same area as a handful of narrow strips that go in the bin. The percentage is identical, but only one of those is material you still own. This is the reason a good optimizer offers a minimum offcut size — you are telling it to leave the remainder in one usable piece rather than scattered.
The third is grain. Locking grain direction takes rotation away from the optimizer, and rotation is one of its main tools for filling a sheet, so the yield falls. That drop is the price of the door looking right, not a fault in the plan. A shop that hits its yield target by unlocking the grain on visible parts hasn’t saved anything — it has moved the cost from the material invoice to the finished piece.
Use the percentage to compare two plans for the same job. It is close to meaningless for comparing two different jobs, because the part mix decides most of it before the software ever runs.
See your actual waste percentage
Enter your parts and stock size — the optimizer shows exactly how many sheets you need and how much material you'll save · 2 free runs without an account, then 3 a month with a free account
Optimize your cut list freeFrequently asked questions
What is a good waste percentage for wood cutting projects?
How can software help reduce wood waste?
Does a higher yield always mean a cheaper job?
How small does an offcut have to be before it is not worth keeping?
Does grain direction increase waste?
Related
Ready to optimize your cuts?
2 free runs without an account, then 3 a month with a free account
Open App