Guillotine vs Free-Cut Nesting: Choosing the Right Strategy
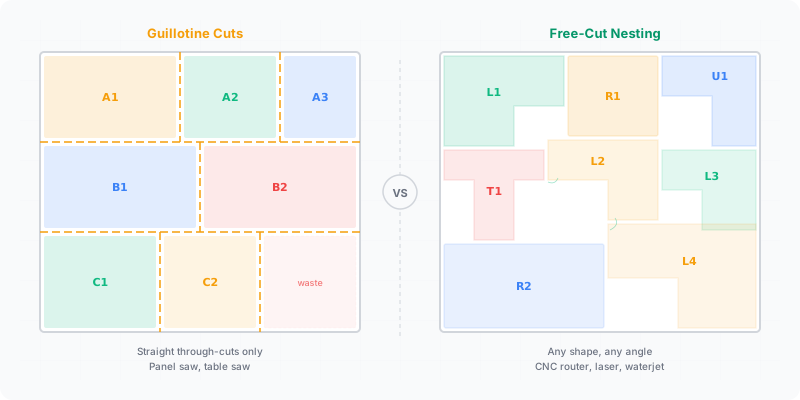
Your saw type determines which cutting strategy actually works in the shop. A panel saw can only make straight cuts that travel the full width or length of the remaining panel. A CNC router can plunge anywhere and cut any path. These physical constraints aren’t just details — they dictate how your optimization software arranges parts, how much waste you produce, and whether the cut plan you printed is even executable on your machine.
What this guide covers:
- How guillotine cutting works and why panel saws require it
- What free-cut nesting unlocks with CNC equipment
- What happened when we ran both of our own engines on the same job
- How to match your cutting strategy to your machinery
What Is Guillotine Cutting?
Guillotine cutting means every cut crosses the entire width or length of the current piece, dividing it into two rectangles. No cut stops partway. No L-shaped offcuts. Each division produces two clean sections, and you keep subdividing until you reach your target parts.
This constraint exists because of how panel saws and beam saws physically operate. The blade travels on a fixed rail from one edge of the panel to the other. You cannot stop mid-sheet, reposition, and cut a different direction without removing the workpiece and re-feeding it — which introduces error and wastes time.
Most optimization software models this as a recursive subdivision tree, as described in the two-dimensional cutting problems survey by Lodi, Martello & Vigo (2002). The algorithm picks an axis (horizontal or vertical), makes one cut, then recursively optimizes each resulting sub-panel. The constraint limits placement options significantly. Two parts that fit side-by-side geometrically might be unreachable via guillotine cuts because no single edge-to-edge line separates them from the rest of the sheet.
What the constraint costs you in material depends entirely on your part mix. Jobs whose parts share a dimension fall into clean strips and lose almost nothing to the rule; jobs with many small parts in many different sizes leave awkward leftover strips, because the rigid cut grid cannot reach into the gaps between larger parts. There is no single percentage that describes this — only your own cut list can tell you which case you are in.
What Is Free Cut (True Shape) Nesting?
Free-cut nesting removes the edge-to-edge constraint entirely. Parts can be placed anywhere on the sheet surface, rotated to any angle (or just 90 degrees for rectangles), and the cutting tool paths around each piece individually.
This is how CNC routers, waterjet cutters, laser cutters, and plasma tables operate. The cutting head moves on X-Y axes and follows a programmed toolpath. It can cut a rectangle in the upper-left corner, then move to the center of the sheet for an entirely different shape. No full-width crosscuts required.
For rectangular parts, free-cut nesting has more geometric freedom because pieces aren’t forced into a subdivision grid. Two parts can sit side by side even if no single straight line separates them from neighboring pieces. For irregular shapes — curved furniture components, signage letters, gaskets — free-cut nesting is the only viable approach.
That extra freedom means free nesting can pack tighter in principle. Whether it actually does on your job is a different question, and the answer depends on the algorithm and the part mix rather than on the constraint alone. The next section is what happened when we measured it instead of assuming.
What We Measured
On 2026-07-31 we ran both of our own engines over the same 2,000-part job: the default guillotine multi-strategy best-of search that the app uses, and the MaxRects free-nesting engine available through the Engine API.
| Guillotine (multi-strategy best-of) | Free nesting (MaxRects) | |
|---|---|---|
| Yield on that job | 93.2% | 90.3% |
| Solve time | ≈1715 ms | ≈62 ms — about 25× faster |
| Saw-cuttable layout | Always — every cut runs edge to edge | Often not guillotine-cuttable |
The guillotine search came out ahead on yield. Read that as one measurement on one part mix, not as a law: a different mix, a different free-nesting implementation, or more search time could reverse it. But it is enough to retire two slogans. The guillotine constraint is not automatically a yield penalty — the constrained engine searched harder and won here. And “free nesting is always better” is not a supportable claim, so do not accept it from us or from anyone else without a measurement attached.
What free nesting reliably bought in this comparison was speed, and what it reliably cost was a layout a panel saw cannot cut.
For a sense of scale on a small job, CutOptim’s built-in demo — 40 parts on 2,440 × 1,220 mm stock with a 3 mm kerf — fits on 2 sheets at 83.28% yield, and comes out as 30 cut lines and 52 saw passes. Your own numbers will differ from all three of these figures, because your parts, stock sizes, kerf and rotation rules differ. Measure your own cut list rather than borrowing a percentage from anyone’s article, including this one.
The Practical Trade-Offs
| Factor | Guillotine Cutting | Free-Cut Nesting |
|---|---|---|
| Waste pattern | Rectangular strips and offcuts | Irregular gaps between parts |
| Offcut reusability | High — clean rectangular pieces | Lower — odd shapes left over |
| Setup time | Fast — push sheet, cut, repeat | Moderate — program toolpath, set origin |
| Cut speed per sheet | Faster — fewer total cuts | Slower — longer toolpath per sheet |
| Machine required | Panel saw or beam saw | CNC router, laser, waterjet, plasma |
| Machine cost | $5K-$50K | $20K-$200K+ |
| Kerf width | 3-4 mm (circular blade) | 3-6 mm (router bit) or <1 mm (laser) |
When Your Saw Type Forces the Choice
This isn’t really a choice for most shops. Your equipment makes the decision for you.
Panel saw or beam saw? You must use guillotine-constrained optimization. Any cut plan that places parts in a non-guillotine arrangement is physically impossible to execute. If your optimizer doesn’t enforce this constraint, you’ll discover the problem mid-cut when you can’t isolate a part without destroying its neighbor.
CNC router or laser cutter? Free-cut nesting is available to you. You can also choose guillotine-style layouts on a CNC if you prefer the simpler cut sequence and the cleaner offcuts — and as the measurement above shows, that is not necessarily a yield sacrifice. Compare both on your own parts before assuming either way.
Sliding table saw (format saw)? Technically you can make non-through cuts by stopping the feed, but this is slow, inaccurate, and unsafe on most models. Treat it as guillotine-only for optimization purposes.
Both machines? Some production shops rough-cut panels on a beam saw using guillotine optimization, then finish complex parts on a CNC. This hybrid workflow uses guillotine cuts to break full sheets into manageable sections and free-cut nesting for final shaping.
Why Most Woodshops Still Use Guillotine
Guillotine cutting dominates the cabinet and furniture industry, and the reasons are practical rather than theoretical.
Speed. A panel saw processes sheets faster than a CNC router for rectangular parts. Push, cut, rotate, cut. No toolpath programming, no vacuum table setup.
Cost. A decent sliding table saw costs a fraction of a CNC router. Most small and medium shops can’t justify the capital expense when their parts are all rectangles.
Simplicity. Guillotine cut plans are easy for any operator to follow. Number the cuts, follow the sequence. CNC nesting requires CAM software knowledge and machine operation training.
Offcut quality. Guillotine cuts produce clean rectangular offcuts that are easy to store, label, and reuse on the next job. Free-cut leftovers are irregular and harder to repurpose.
For shops cutting primarily rectangular cabinet parts from melamine or plywood, guillotine optimization hits the sweet spot of speed, simplicity, and reusable offcuts.
What CutOptim does today. The 2D Panel mode is guillotine-only: every cut plan it produces runs edge to edge, so the layout is executable on a panel saw, and there is no cut-type switch inside it. The same plan runs fine on a CNC router. What you can control there is First cut direction (Auto, Horizontal, or Vertical), which sets whether the first guillotine cut runs across or down the sheet.
Free-cut nesting is available in two places. True-shape nesting of irregular polygons — the real free-cut case on a laser, plasma or waterjet — is now a separate Nesting mode in the app: import part outlines as SVG or DXF (or place shapes by hand), and it packs arbitrary polygons into each other’s pockets, with per-sheet exclusion zones for defects; on a representative 272-part job it used 6 sheets where the same parts by bounding box needed 9. The same true-shape nesting is on the CutOptim Engine API via POST /v1/optimize/nest — see the laser cutting nesting API and the sheet metal nesting API. For rectangular parts, an opt-in MaxRects balanced engine returns non-guillotine layouts through the Engine API. The 2D Panel default is unchanged.
Get a cut plan that matches your saw
Always guillotine-compatible — every cut runs edge to edge. Works with any panel saw.
Optimize your panels now